One day I was setting up a wordpress server in my homelab so a friend of mine could build a website for one of his clients. After setting that up I thought that it would be nice to have a blog to share my struggles in the wonderful world of IT.
If you want to create a wordpress website you have two o
options, you can use a hosting provider or you can host it yourself.
I chose to host my own, but how?
After doing some research, I found I need to have the following:
- Server to run wordpress on.
- WordPress install.
- Domain.
1. Server
For this step all I had to do was spin up a new VM on one of my proxmox nodes. I will go into more detail on proxmox and VMs in a future post.
2. WordPress install
Installing wordpress on a server is not very difficult. The official wordpress documentation does a good job of explaining how to install all the needed components. I however am lazy, and did not feel like setting up all the needed components, so I did some digging and found this wonderful git repo: https://github.com/nezhar/wordpress-docker-compose, this is a docker compose script intended for hosting a dev server if you are developing WP plugins. The beauty of this approach is that you just run one docker command and everything is setup for you.
3. Domain
This was the easiest step, just buy a domain from Hostdinger, GoDaddy etc.
All done, right?
While the above is all you need for a wordpress site its not that simple, it never is. Let’s take a look at how a client (you) connects to the server (this website)
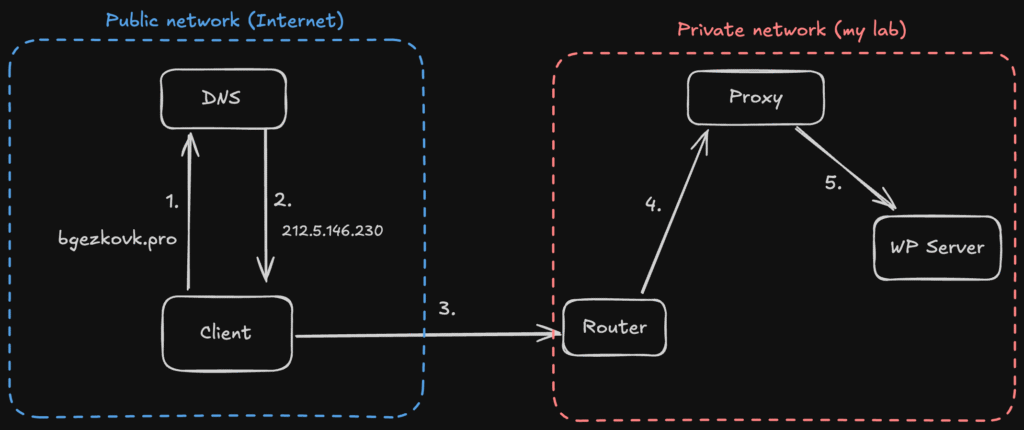
Lets break it down step by step:
- We send a DNS query to the dns server (google, cloudfare, ISP, etc.)
- The DNS server returns the IP that is associated with this domain.
- From there the traffic goes to my router that acts as the gateway to my home network.
- From my router it goes to my nginx proxy that I have deployed in my lab enviroment.
- The proxy forwards the traffic to wordpress and also handles TLS termination, meaning that the communication between the proxy and wordpress is plaintext. Since this communication is internal the fact that it is not encrypted is not an issue.
Step 1 and 2 are generally not handled by us, we only need to concern our selfs with steps 3 to 5. On the router all we need to do is to open port 443 (default port for https traffic) and point it towards our proxy. On the proxy we need to configure the passthrough, meaning that when the proxy receives traffic that is destined for bgezkovk.pro it will forward it to the ip of the host machine running my wordpress instance.
If you want to learn more about how to configure a nginx proxy you can checkout this blog post by Akash Rajpurohit: https://akashrajpurohit.com/blog/nginx-the-reverse-proxy-in-my-homelab/
And thats about all you need to host your own wordpress site!
Stay tuned for future posts as I plan to transition all of the docker containers to my kubernetes cluster.
Leave a Reply